 |
|||
|
|
|||
|
|
|||
|
|
|||
| 1. | Attach specimen with ventral surface to a small piece of card board with a very small drop of water soluble glue. Wings must remain free of glue. Specimens stored in ethanol have to be dried first by placing them for a short time on a tissue. | |
| 2. | Write sample/specimen number on card board. | |
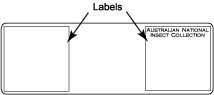
| 3. | Glue labels on the slide and write sample/specimen number on label. The labels should be made of 1-1.5 mm thick white card board. | |
|
||
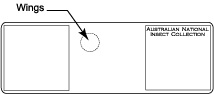
| 4. | Remove wings with insect pin. This should be done carefully to avoid removing diagnostically important setae from the submarginal and marginal veins and is best achieved by moving the wings at the point where they are attached to the body. Preferably the fore wing comes off with the tegula attached. | |
| 5. | Put a small drop of thin Canada balsam at the location of the slide which is designated for the wings. (Note: wings, body, and head should be oriented upside down so that the specimen is in upright position when examined with a compound microscope). | |
| 6. | Transfer wings to drop of Canada balsam and arrange them. Leave slide on a hot plate (60° C) for several hours to fix their position. | |
|
||
| 7. | Add drop of water to the specimen glued on the piece of card board. After a short while the specimen will float on the drop of water. | |
| 8. | Mazerate specimen in 10% KOH, either by heating in an Eppendorf tube for 5-7 minutes at 97° C using a block heater, or by leaving in an excavated block (covered with lid) for about 12-24 hours at room temperature. | |
| 9. | Remove KOH with pipette. For the following steps, excavated block should be covered with lid. | |
| 10. | Add 5 drops of glacial acetic acid and leave for 2 minutes | |
| 11. | Remove acetic acid and add 5 drops of distilled water. Leave for at least 30 minutes, longer (e.g. 2 hours) is better and helps to avoid collapsing at later steps in the procedure (in particular if specimen was preserved in ethanol). | |
| 12. | Add 5 drops of 70% ethanol and leave for 10 min. | |
| 13. | Remove liquid and add 5 drops of 70% ethanol. Leave for 10 minutes. | |
| 14. | Add 5 drops of absolute ethanol and leave for 10 minutes. | |
| 15. | Remove liquid and add a few drops of absolute ethanol so that specimen is just covered. Leave for 10 minutes. | |
| 16. | Add 3 drops of clove oil and leave excavated block uncovered for 20 minutes. | |
| 17. | If specimen was not preserved in ethanol move directly to step 19, otherwise add 3 drops of a mixture of 60% clove oil and 40% Canada balsam. Leave for 10 minutes. | |
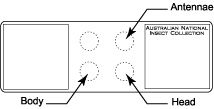
| 18. | Place three drops of thick Canada balsam on the slide at the appropriate locations for body, antennae, and head. | |
|
||
| 19. | Transfer specimen from clove oil (or clove oil/Canada balsam mixture if specimen was preserved in ethanol) to bottom left drop of Canada balsam which is designated for the body. | |
| 20. | Separate head from body with insect pin. This is easiest if the specimen is lying on its side. | |
| 21. | Carefully transfer head (with antennae attached) with insect pin to top right drop of Canada balsam. | |
| 22. | Detach antenna from head with insect pin. This is easiest if the head is in upright position and the outermost tip of the pin is used to remove the antenna at its very base. The radicle should be attached to the antenna and not to the head. | |
| 23. | Carefully transfer head with insect pin to bottom right drop of balsam. | |
| 24. | Arrange body so that legs are spread and body is not tilted. | |
| 25. | After all parts have been arranged put slide on hot plate (60° C) for about 24 hours. | |
| 26. | Add a small drop of thin Canada balsam to each of the four positions and cover with round cover slips (6mm diameter). Care should be taken that the cover slips are horizontal. | |
| 27. | Place immediately on a hot plate (60° C) for several hours. | |
| 28. | Store in an oven for several weeks or until Canada balsam is sufficiently hardened. | |
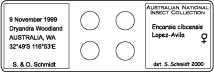
| 29. | The slide should be labelled with locality information of the left and species identification of the right side. | |
|
||
| Web site designed and authored by Stefan Schmidt; last updated May, 2005 | ||||
| Copyright 2001, CSIRO Australia |
| [webmaster - February 2001] |
| Use of this web site and information available from it is subject to our |
| Legal Notice and Disclaimer |